How to Recover Permanently Deleted Files: Step-by-Step Guide
Did you accidentally delete a critical file and then empty the Recycle Bin or press Shift+Delete? Or a command-line mishap wiped out an entire directory? Don’t panic. In most cases, “permanently deleted” does not always mean gone forever.
 File deletion is more like removing a label from a drawer; the contents might still be there until something else replaces them. The key is to act fast and avoid making it worse.
This step-by-step guide shows how to recover deleted files on Windows, Mac, and Linux using file recovery tools, file system knowledge, and smart prevention strategies. Whether you are a tech user or an IT pro, this guide will walk you through file recovery and help you avoid future data disasters.
How to Recover Permanently Deleted Files
The moment you realize a file is missing, stop writing to the affected disk. Don’t save anything, install anything, or restart or continue using the drive. Why? Because, in most cases, deleting a file only removes the pointer to its data, not the data itself. The data sticks around until it is overwritten.
- Do: Disconnect the drive or stop processes writing to it.
- Don’t: Download recovery tools to the same drive; that is the fastest way to destroy what you are trying to save.
Step 1: Figure Out What You Are Trying to Recover
To recover successfully, know these three things:
- File Type: Photos, documents, logs, etc.
- Original Location: Was it on C:, an external SSD, or a network share?
- How Long Ago It Was Deleted: The sooner you act, the better.
Also, determine the drive format:
- NTFS / FAT32 (Windows)
- ext3/ext4 (Linux)
- APFS/HFS+ (macOS)
These factors will dictate the recovery tools and success rate. Files recently deleted have a higher chance of recovery.
Step 2: Check for Backups First
Before diving into recovery tools, look for backups. You might be saved already.
- Windows File History / macOS Time Machine: If configured, these built-in tools might have a recent version.
- Dedicated Backup Software: Check your Acronis, Veeam, Macrium Reflect, or other backup solutions.
- Network Shares / Server Backups: If the file was on a network drive, contact your IT department. They may have server-level backups.
If a backup exists, restore from it. You are done.
Step 3: Use Reliable File Recovery Tools
If backups fail, specialized software is your next best bet. These tools scan the drive surface for recognizable file signatures and data fragments, attempting to piece together deleted files even without their original index entries. Here are the best file recovery tools by OS:
For Windows:
- Recuva: Good for home users. Easy interface. Decent results for recently deleted files.
- Windows File Recovery Tool: Command-line tool from Microsoft, but it only supports NTFS and limited FAT/exFAT recovery.
- R-Studio: A powerful, paid tool used by forensic teams. Handles damaged drives, lost partitions, and RAID.
- EaseUS Data Recovery Wizard: User-friendly GUI with support for recovering files from formatted, deleted, or corrupted partitions. Suitable for both beginners and pros.
For Linux:
- TestDisk: Can recover lost partitions and boot sectors.
- PhotoRec: Recovers files based on file signatures; doesn’t care about the file system.
- extundelete: Works with ext3/ext4, but requires the partition to be unmounted.
For Mac:
- Disk Drill or Data Rescue: Mac-native tools with intuitive UIs. Useful for both internal and external drives.
Tip or Considerations:
- Download Source: Only download from the official vendor website to avoid malware.
- Installation Location: Critical! If recovering from your main OS drive (C:), DO NOT INSTALL THE RECOVERY SOFTWARE ON THAT DRIVE! This will overwrite data. Install it on a different drive (like a USB stick) or run it from a bootable recovery environment if the software supports it. If recovering from a secondary/external drive, you can install the software on your main C: drive.
Step 4: Target the Right Disk and Scan
Once your recovery tool is ready:
- Select the Drive/Partition: Choose the drive where the file was originally located.
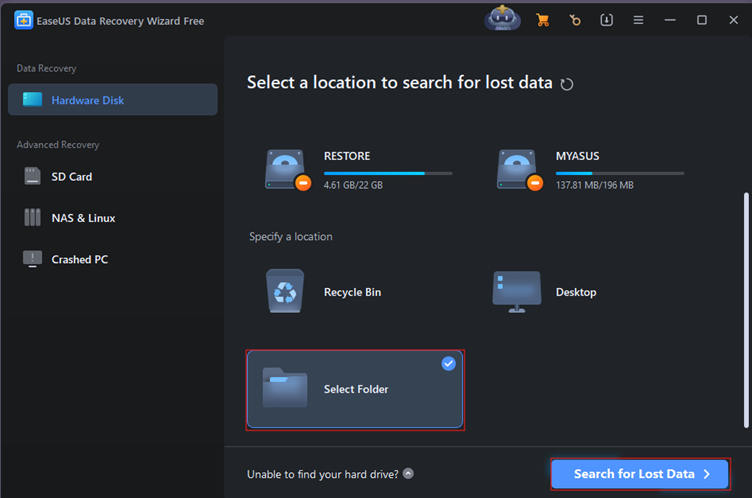
- Choose Scan Type:
- Quick Scan: Looks for recently deleted files.
- Deep Scan: Looks for file headers and footers across the whole drive.

The deep scan takes longer but is more thorough. It is essential to check when the file was deleted days or weeks ago.
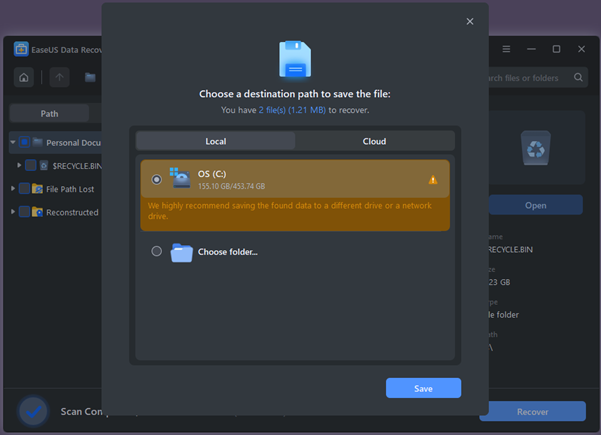
Step 5: Recover and Save to a New Location
Once the scan finishes:
- Use Preview: Most tools have a preview function. Use it to check if the file content looks correct before recovering.
- Select Files: Check the boxes for the files you want to recover.
- Choose Recovery Location: Never restore recovered files to the same drive they came from. Always pick a separate external hard drive, a USB stick, or a network location.
Step 6: Implement a Real Backup Strategy
If you recovered your data, great. Now, prevent this from ever happening again.
Use 3-2-1 backup strategy:
- 3 copies of your data
- 2 on different media (e.g., SSD and external drive)
- 1 offsite (cloud or remote NAS)
Automate your backups. Humans forget. Scripts don’t.
In Conclusion
Losing important files is stressful, but “permanently deleted” doesn’t always mean losing forever. If you move quickly, avoid using the affected drive, check backups, and carefully use reputable recovery software, recovery is often possible. Remember to install and recover to different drives. And please, set up those backups; it is the best defense against data loss! Stay safe out there.
Explore other practical walkthroughs:
- Step-by-Step Guide for theHarvester Tool
- Steps for Effective DNS Footprinting
- The Ultimate Guide to SMTP and DNS Enumeration Practices
- Web Vulnerability Scanning with Nikto
- Mastering Network Discovery with Nmap: A Step-by-Step Guide
- What is Metasploit: A Practical Guide for Penetration Tester
- Shell GPT: A Practical Walkthrough
- Burp Suite: A Practical Walkthrough for Cybersecurity Enthusiasts
- Firewall Testing with Hping3: A Comprehensive Guide
- Session Hijacking Using Burp Suite
- Packet Sniffing with Snort: A Practical Guide
- Information Gathering using Spiderfoot: A Practical Walkthrough
- Practical Guide: Intercepting HTTPS Traffic with Burp Suite
- Spoofing MAC Address Using Macchanger tool
- Beginner’s Guide to Sniffing with Arpspoof
SOC Analyst Training with InfosecTrain
InfosecTrain’s SOC Analyst Hands-on Training provides practical knowledge of data recovery tools and forensic techniques used in real-world security operations. It helps learners understand how forensic tools can be used to attempt recovery of permanently deleted files, analyze disk structures, and identify residual data, skills essential for incident response and digital forensics in a Security Operations Center (SOC) environment.

